
For just about every client project we build and program in WordPress, we use a combination of the Divi Theme by Elegant Themes, and the animation tools provided by GSAP.
If you’re reading this post, we’re assuming that you are already using Divi and looking to add the full and amazing functionality of GSAP’s library of amazing features and plugins, so we’re not going to pitch the products, as both of these products provide a ton of great documentation and product support.
One of the issues that we ran into when we were first introduced to the GSAP library was the task of actually adding GSAP to a Divi website. If you’re in this camp, this post is for you.
This post is written for anyone with at least a basic understanding of JS and how to write GSAP. If you’re finding that this task is beyond your technical capabilities, please feel free to get in touch and we’d be happy to help with your next project.
Steps to Add GSAP to the Divi Theme
Step 1) Make sure you have a Child Divi Theme Installed and Activated
This is necessary to add your scripts that won’t be overwritten by future theme updates, and you don’t want to run the risk of corrupting the main parent theme by messing with the functions or files. Please read Divi’s own documentation on how to add a divi child theme to your site.
Step 2) Find the appropriate GSAP files needed for your desired animations
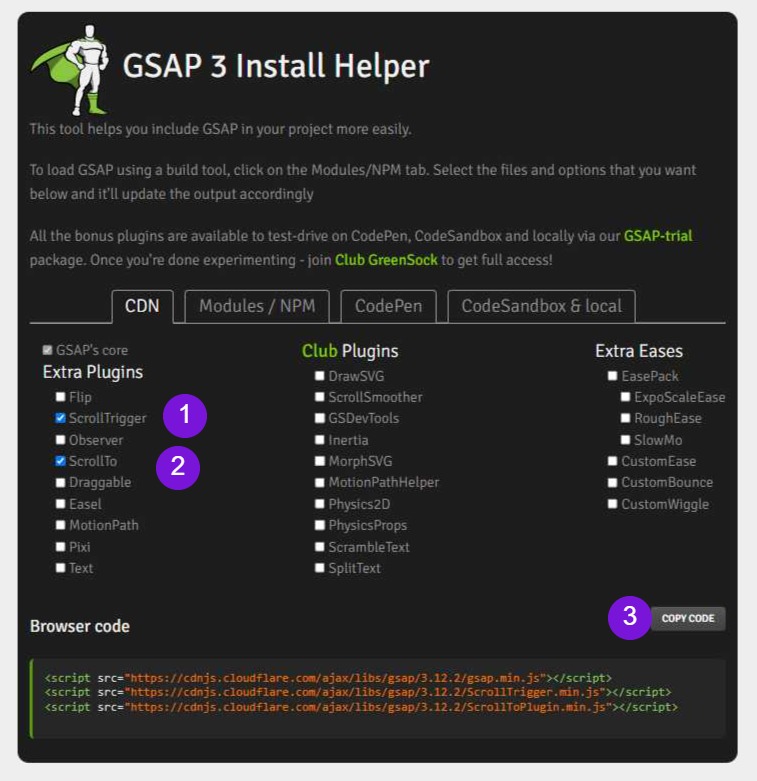
When you’ve determined which of the GSAP features you’ll need for your site, we recommend visiting GSAP’s Easy Installer Instructions page to choose which plugins you’ll need for your project.
We generally recommend using the CDN installer, as it allows you to to find the latest version of each plugin, along with the direct plugins scripts without having to worry about saving and uploading additional scripts to your site.
In this example, we’re going to install the main GSAP core (required to make any other plugins work), ScrollTrigger, and ScrollToPlugin (all freely available).
In the GSAP installer, click the check boxes as described and then click the “Copy Code” button.
Step 3) Call the GSAP scripts on your site by adding them to the Header Code
When you’ve determined which GSAP tools or plugins you need to create your custom animations, you’ll need to enqueue them to your site’s header. The Divi theme makes this super easy.
Go to your settings under Divi -> Theme Options -> Integrations tab.
If it’s not already, enable “Enable header code”, and paste the script codes you copied from Step 2 into the Add code to the < head > of your blog section.
The GSAP scripts will now be available for use in your custom animation file (next step).

Step 4) Create a custom gsap-animations.js file to call/create your GSAP animations
You will need to create a custom .js file that has all of your custom GSAP animations. To make things easy, we usually call our scripts something like gsap-animations.js, however you can use whatever naming convention that makes sense for your project.
In this file, essentially we’ve added the necessary coding to wait for the DOM and scripts have loaded, and we only call on GSAP when not logged into the backend of the site, which can create complications with editing. This is all needed to call GSAP in the correct order for it to function properly with your WordPress site and child Divi theme.
The following code will allow you to add all of your GSAP animations (reload the page if you don’t see the code block below).
// wait until DOM is ready
document.addEventListener("DOMContentLoaded", function (event) {
    // wait until images, links, fonts, stylesheets, and js is loaded
    window.addEventListener("load", function (e) {
        //only run code on frontend of site (not when logged in making edits)
        if (document.body.classList.contains('wp-admin')) {

        } else {
            //register GSAP plugins
            gsap.registerPlugin(ScrollTrigger, ScrollToPlugin);
            // custom GSAP code goes here

                //small example of GSAP
                gsap.from('#example-1',{autoAlpha:0});

                gsap.set('.example-2',{scale:1.2});


            //end of custom GSAP for site
        }
        // end of checking logged in
    }, false);

});
Copy the Code
If you’re having trouble, you can download this file directly from GitHub here and by clicking on the download icon.
Step 5) Register any necessary GSAP plugins required for your code
In this example, we registered the ScrollTrigger and ScrollTo plugins. This is required for each plugin you’re trying to use.
Step 6) Write your awesome code
In this demo, we commented out where to add your GSAP code, and provided two demo example for basic tweens targeting “#example-1” and “.example-2”.
This is where you’d update and add any of your code.
Step 7) Upload your new custom JS file to your site
Now that you’ve created your amazing animations using your code editor of choice, you’ll need to add your new custom JS file (animate-gsap.js in this example) to your server in order to call your scripts.
Create a new subdirectory within your Child Theme /js (or whatever you want) and upload the file there.
The final file path would looks something like this:
https://your-site.com/wp-content/themes/your-child-theme/js/animate-gsap.js
Make sure to replace “your-site” with whatever you site is, and “your-child-theme” with whatever your child theme folder directory is.
Step 8) Call your new custom JS file to trigger your animations
You’re almost there. Now we need to enqueue your new custom JS file it gets called when someone visits your site.
We’re going to repeat the process we did when adding the GSAP library scripts, by going to the Divi settings:
Divi -> Theme Options -> Integration.
In the header options below the other GSAP scripts, paste in your script tag. In the example file above, the script tag would look like this:
<script src="https://your-site.com/wp-content/themes/your-child-theme/js/animate-gsap.js"></script>
As before, you need to update the url and child theme directories, file path, and file name if you changed it.
One important note is this file should be called after your other GSAP script tags so they are enqueued and available when your new custom JS file calls on theme, so the order matters from a performance standpoint.
Hit “Save”.
Step 9) THAT’S IT
Congratulations! You’ve successfully added GSAP to your Custom Divi Theme.
As you test and make changes to your custom JS file, you’ll need to save it and re-upload/overwrite the old file. When you do so make sure to clear your cache on the front end to make sure you can see all of your latest changes.
Note about JQuery in the Divi Theme
One more note about using JQuery in this file to animate GSAP, (or just do any JQuery in Divi), although it’s a little more time consuming, something about just calling the shortcut “$” as a proxy for JQuery conflicts with the Divi theme, so it’s easiest and just best practice to write out the longform “JQuery” each time for proper use.
Example:
Correct:
jQuery('.example-3').addClass('example-added-class');
Incorrect:
$('.example-3').addClass('example-added-class');
We hope you found this post valuable and saves you time. Please feel free to reach out if you’d like our help launching your next digital project, whether it be a website, app, ecommerce store, or more.
Happy coding,
The Chainlink Team