Quick note – this post focuses on development for WordPress using the Divi Theme and WP-Rocket’s built in LazyLoad feature, however I’m sure much of the code or best practices would apply for website developers using LazyLoading and Anchor Link Smooth Scrolling across all themes.
About LazyLoad
As anyone reading this post likely already aware, LazyLoading is a must for any website with lots of images, as it defers image loading until the images are about to enter the viewport of your browser, which greatly increases your site loading speed, which can have drasticly positive SEO implications (or negative if you don’t).
There are already a ton of great resources available about the benefits of LazyLoading (WP-Rocket) (Google) and I’m going to assume everyone reading this post is already aware of the benefits and has LazyLoading implemented on their site.
About Anchor Smooth Scroll navigation links
Anchor scroll navigation links are another great standard feature that allow you to link to a specific section, div or element of a page by clicking a link or button and targeting an element’s #ID, and the browser will go to that point on the page.
This can be used for one-page websites and landing pages, or just as a great UX feature to help your website visitors navigate your site.
Similarly, I’m assuming you already have Anchor scrolling navigation links in action on your site, or you wouldn’t be reading this.
LazyLoad and Anchor Link Scrolling Conflict
However a consistent issue across the web relates to mixing LazyLoading with internal anchor links. Due to the nature of how LazyLoading works, by definition images won’t load until they’re about to come on the screen as users scroll down the page.
Why does it happen? From WP-Rocket…
“Scroll targets are calculated upon page load by the browser. Once the page has fully loaded, the browser “knows” the position of every scroll target, so it can scroll to that exact position once you click a menu link.
However, with LazyLoad enabled, images outside of the initial viewport don’t get loaded directly. So the positions of elements that the browser has calculated upon page load are skewed.
Once you start scrolling, lazy-loaded images start to appear, adding to the document’s overall height, and those elements your browser “knew” the positions of before get pushed further down the page.”
Even per WP-Rocket’s own advice, the only way around this is to disable LazyLoading on the post you want to use the anchor links. There are a few ways around this, like defining the image dimensions in the image properties, however with most modern WordPress themes and responsive web design, this is not always the case, at least not in the Divi Theme. And again, if you have already tried, or can’t implement that, I’m assuming that’s why you’re here.
What we figured out about controlling the Divi scroll speed
After thinking long and hard about this, and LOTS of attempts, we were able to find some solutions that work well. As with any Theme customization, a lot will depend on your needs and preferences, but this should hopefully be a good resource to find a working solution for your site.
One thing that is inherent in the Divi Theme (and likely many) is the anchor link smooth scroll speed, so we looked for a way to control that speed. If you can eliminate the smooth scroll effect and jump directly to the target anchor position #id, the images don’t enter the viewport & VOILA! Problem solved. Again this will likely vary by theme and developer, however this short JQuery code allows for DIVI users to “override” the theme defaults.
DEVELOPMENT WARNING – PLEASE READ BEFORE MOVING AHEAD
As with any WordPress theme, it’s highly inadvisable to change the direct theme file coding, because at a minimum it will be overwritten in any future theme updates, and at worst could potentially crash your entire site if your customization and coding conflicts or is not applied correctly. We always recommend using a Child Theme for any theme modifications.
We inspected what in the Divi theme was controlling the smooth scroll speed, and found this part of code located in
/wp-content/themes/Divi/js/custom.js
You could just copy this file to your child theme folder and make direct adjustments, but that seemed like a wasted effort to simply change the et_pb_smooth_scroll parameters. Here is the original code in the Divi theme for your reference.
By using JQuery, we were able to “override” the theme defaults and change the scroll parameters to 0, which removes the scroll timing on the Divi anchor links. You could use this same logic to slow it down more if that was your goal, however that wouldn’t fix the wrong position on the page issue.
For other developers, we found this to be a great resource for the Divi Theme requirements for writing/adding JQuery within Divi so that there are no conflicts with other scripts and resources.
Divi JQuery Code to Adjust Divi Smooth Scroll Speed
<script>
jQuery(document).ready(function( $ ){
$( 'a[href*="#"]:not([href="#"])' ).click( function() {
    var $this_link = $( this ),
        has_closest_smooth_scroll_disabled = $this_link.closest( '.et_smooth_scroll_disabled' ).length,
        has_closest_woocommerce_tabs = ( $this_link.closest( '.woocommerce-tabs' ).length && $this_link.closest( '.tabs' ).length ),
        has_closest_timetable_tab = $this_link.closest( '.tt_tabs_navigation' ).length,
        has_closest_eab_cal_link = $this_link.closest( '.eab-shortcode_calendar-navigation-link' ).length,
        has_closest_ee_cart_link = $this_link.closest( '.view-cart-lnk' ).length,
        has_acomment_reply = $this_link.hasClass( 'acomment-reply' ),
        is_woocommerce_review_link = $this_link.hasClass( 'woocommerce-review-link' ),
        disable_scroll = has_closest_smooth_scroll_disabled || has_closest_ee_cart_link || has_closest_woocommerce_tabs || has_closest_eab_cal_link || has_acomment_reply || is_woocommerce_review_link || has_closest_timetable_tab;

    if ( ( location.pathname.replace( /^\//,'' ) == this.pathname.replace( /^\//,'' ) && location.hostname == this.hostname ) && ! disable_scroll ) {
        var target = $( this.hash );
        target = target.length ? target : $( '[name=' + this.hash.slice(1) +']' );
        if ( target.length ) {

            // automatically close fullscreen menu if clicked from there
            if ( $this_link.closest( '.et_pb_fullscreen_menu_opened' ).length > 0 ) {
                et_pb_toggle_fullscreen_menu();
            }

            setTimeout(function() {
                et_pb_smooth_scroll( target, false, 0 );
            }, 0);

            if ( ! $( '#main-header' ).hasClass( 'et-fixed-header' ) && $( 'body' ).hasClass( 'et_fixed_nav' ) && $( window ).width() > 980 ) {
                setTimeout(function(){
                    et_pb_smooth_scroll( target, false, 0, 'linear' );
                }, 0 );
            }

            return false;
        }
    }
});
});
</script>
Copy the Code
Where to Put the JQuery on My Site
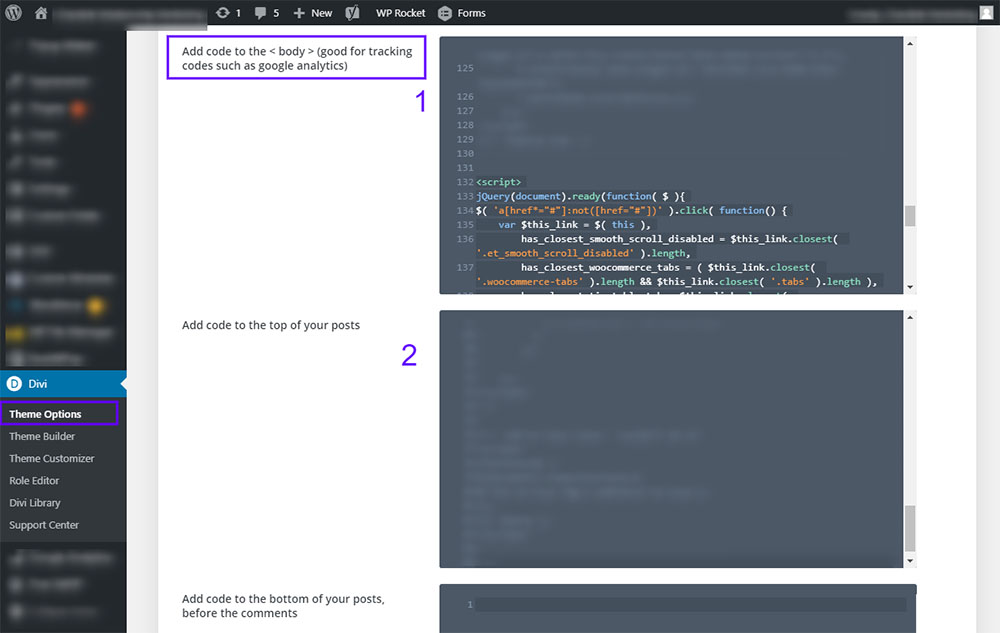
Depending on your site needs, you can either add this to the body of your site (in Divi under the “Theme Options” > “Integration” tab, titled “Add code to the < body > (good for tracking codes such as google analytics)”.
You could also add to the top of posts. For performance purposes, we wouldn’t recommend adding to the header code, but there might be instances where that would make sense for a site and to each his own.
For a lot of users, this may immediately solve the problem (remember to clear your cache). Try one of your Anchor links and see the difference.
Additional Scrolling Adjustment Fixes and Solutions
For our website and maybe many, a lot of the anchor navigation scroll points were just below an image on the page, which creates an issue due to the default nature of WP-Rockets’ LazyLoad.
The default settings for the LazyLoading Threshold for WP-Rocket are to load images that are within 300px of the viewport (browser window).
There are a couple of solutions that will vary based on your needs and how you want your site to function.
Solution 1 – Change the div/content above your Anchor Scroll point so it’s not an image.
This might not work for all, as some users naturally want the image to come right before the desired scroll point.
As long as there isn’t an image right above the scroll point (or within 300px to be exact, you will be fine.
Solution 2 – Use extra Padding/Margin
Another option is to add up to 300px of margin/padding between the anchor target link and the image above it, however it’s likely no one wants this, or add any non-LazyLoaded element above the scroll point. Problem solved!
Solution 3 – Adjust the WP-Rocket LazyLoad Threshold in your Functions.php
Assuming you’re using WP-Rocket’s LazyLoad feature, you can edit your child theme’s functions.php file, you can add this small snippet of code to change the LazyLoad Threshold (read more on WP-Rocket).
By default, WP-Rocket LazyLoad loads images that are within 300px of the viewport (browser window). However you can adjust this threshold with the following. In this example the threshold is set to 0px:
function rocket_lazyload_custom_threshold( $threshold ) {
	return 0;
}
add_filter( 'rocket_lazyload_threshold', 'rocket_lazyload_custom_threshold' );
This means that essentially images won’t try to load until they’re on the screen.
While this will again solve the Scrolling issue, the trade-off here is that images will appear to “snap” into place, because they will load when they come on the screen.
Again this is something you’ll have to figure out for yourself and your website needs, as visually it’s not ideal.
In the event you’re not using WP-Rocket, most other LazyLoad plugins or JQuery can also be customized, so speak to your plugin provider or developer about this issue if that is the case.
Fixed Header Issue Anchor Scrolling Issue after Adjusting LazyLoad Threshold
Finally, one other issue was occurring for us, that we assume would be a common Divi Them problem.
Because we have a fixed header on our website, even when we altered the LazyLoad threshold to 0px, there was still actually 65px of space from the top of the viewport due to the size of our Fixed header.
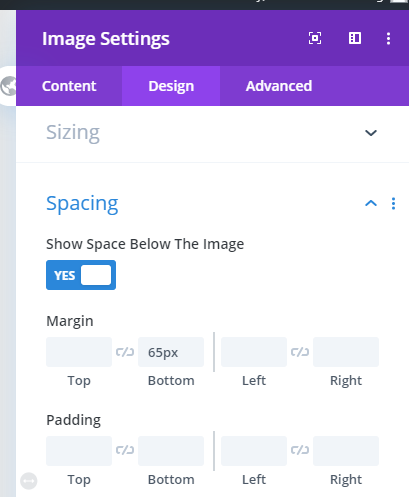
This will vary based on your theme settings and customizations. Our simple solution to this was to add 65px of Margin below each of the images where this issue is occurring, and using 30px of margin for the images on Tablet & mobile, because the Fixed header only works on Desktop, unless you’ve customized your header CSS.
Again, this is a stylistic tradeoff and will need to be evaluated based on your website preferences and needs.
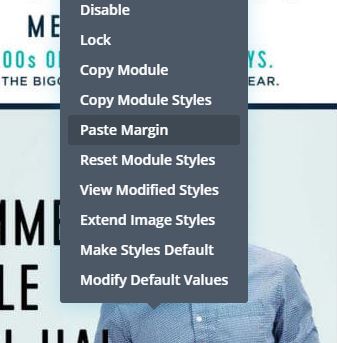
Below we show where to add the Image Margin for Desktop & Tablet/Mobile, and if you have multiple sections like this, how to quickly Copy & Paste this setting to your other images.
Divi Image Margin to Fix Lazy Load Scrolling Issue
As a reminder, the 65px was what we used for our site that you’re on now due to the height of our Fixed Navigation bar, so customize as needed for your settings.
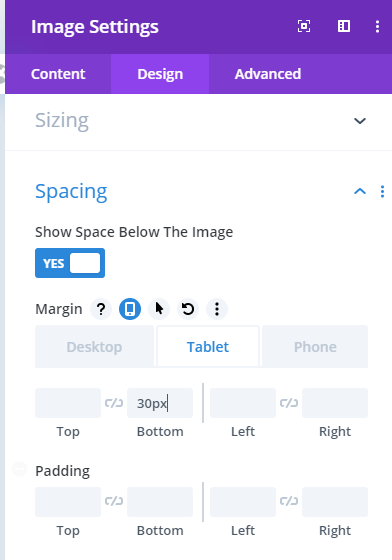
Mobile Divi Image Margin to Fix Lazy Load Header Scrolling Issue
We changed the Tablet/Mobile margin to 30px because the extra Margin isn’t required on the Tablet/Mobile view because there isn’t a fixed header.
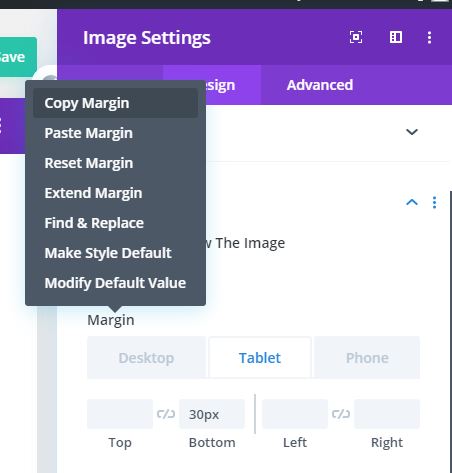
Copy The Image Margin Settings if you need to apply to many images
Just a helpful time-saver if you want/need to apply this setting to multiple images across your Divi site, you can right click on the “Margin” header and click “Copy Margin”.
Paste the Image Margin
Related to just above, you can right click on any of your image elements to Paste the same margin.
Summary
Hopefully this will ease the pain for a lot of developers that are running into this issue, as we know it was a long-time researching to fix for us.
Ultimately, it will take a little playing around to see which combination of these different options works best for you and your website needs.
Divi, if you’re reading, It would be great if Divi made the Smooth Scroll Speed an adjustable setting in the future, however even then, the other conflicts listed above would occur. Please let us know if you have any issues or comment below.
If you’re curious to sign up for our future updates, we send regular weekly development and Divi-specific features and tricks in our update emails.
Lastly, if any (or all) of this post was overwhelming, please reach out and we’re always happy to provide custom support for any potential future partners.
Thanks for reading!
P.S. A note to other developers…
As a quick background, this is the first actual fix we’ve seen online to this inherent problem across the internet. If you’ve been banging your head against a wall (like we have), here’s a list of the other fixes we tried to no avail. Hopefully this will save you time if you don’t want to use any of the above.
1. Excluding Image by Class
WP-Rocket allows users to exclude images from LazyLoad by img class (details here), however, there is currently no way to (in Divi at least) to add a class DIRECTLY to the image – the class gets added to the parent Div, which doesn’t help. We even tried to add the class via JQuery, however that didn’t work due to loading issues.
2. Setting Sizes for the LazyLoad Placeholder Image Using CSS
This unfortunately didn’t fix the issue either, because without Height & Width dimensions in the <img> tag (doesn’t apply to Divi), you’re making a guess at how big to make the placeholder. Ugh.
3. Using JQuery to add Padding to the Img Div that is removed on Image Load
Maybe our JQuery skills just aren’t there, but this couldn’t be achieved within Divi
We tried a lot of other attempts too, to no avail, so at least you know you’re not alone ha.